
If you’re reading this guide, chances are for some reason (which I’ll be explaining shortly in this article), WordPress are sending out emails but you can’t seem to find them in your inbox. There are quite a few instances, like for example, every time a visitor tries to contact you using a form on your website, WordPress will notify you via email. But in this case, the email doesn’t appear in your inbox at all, or has instead gone to your spam folder.
Because of this, you might miss important messages from your visitors, and also, if WordPress sends emails newsletters to your visitors, that can also end up in their spam folder, which looks unprofessional and can make your visitors not trust your website.
But not to worry because by the the end of this short article, you’ll be able to fix this issue and receive all WordPress emails in your inbox like it’s supposed to be.
But before that, let’s cover why emails sent out in WordPress are not showing up in the inbox.
Why Are WordPress Emails Not Showing Up In Gmail Inbox
After creating a business email for your website, the safest way you can avoid any email delivery issues is if you assign a different service like SMTP to take charge of mail delivery. These email issues may be due to several factors like your WordPress hosting server not properly configured to use the PHP mail() function.
Even if it is, there are many security tools adopted by services like Gmail to help reduce spam emails, and emails sent by WordPress websites most of the time fail to pass these security checks.
This is why an email sent out from your WordPress website through a contact form for example, would not show up or end up in your spam folder instead of your inbox. The same also applies when you send out email newsletters to your subscribers. Your mail may not even find it’s way to your subscriber’s spam folder, much less their inbox.
Solution: Fix WordPress Email Issues with SMTP and The Google Cloud Platform
Thankfully, there’s always a fix for any issue you may encounter with WordPress, and this one is no exception. Now lets see how you can connect your WordPress website with the Google cloud platform. Once you connect your WordPress website with the Google cloud platform, You’ll be able to receive all the WordPress emails in your inbox.
We are going to connect our WordPress website with the Google cloud platform in just 2 simple steps.
• The first step is to install a plugin in wordpress,
• The second step is to set up the Google Cloud Platform
Step 1: Install WP SMTP Plugin
Now before we can install a plugin in WordPress, we first need to log into the WordPress dashboard of our website.

Now to install the plugin, Let’s go to Plugins and click ‘Add New’ Here search for the Plugin called ‘WP SMTP’

And you will see this plugin by WPForms as shown in the image above. Install the plugin by clicking Install Now And then Activate.
Once we have successfully installed the plugin, Click Settings And it will take you to the page as shown in the image below.

Here you’ll need to enter your Business Email in the ‘From Email’ box, and then enter any name like your Business Name in the ‘From Name’ section. Once you’ve completed that, Scroll down and select ‘Google / Gmail’ as the Mailer.

After that we can see that a new section is now visible as shown in the image above, where we need to enter a ‘Client ID’ and a ‘Client Secret’ which brings us to the second step.
Take note of the ‘Authorized redirect URL’ we’re going to need it later down the line.
Step 2: Setting up Google Cloud Platform
Now to finish setting up the WP SMTP Plugin from step 1, we need to setup our website with the Google Cloud Platform.
To do that, go to the url: console.developers.google.com in a new tab and login with your Google account. After which you’ll be taken to the Google Cloud Platform dashboard as shown in the image below.

Now we need to create a project on the Google cloud platform by clicking ‘Create Project’ and enter a project name then click ‘Create‘.

The project will be created as in the image below. Now locate and click ‘Enable APIS and Services‘ highlighted in the image.

After that, now search for ‘Gmail API’ in the search box on the next page that loads up

And then you will get this Gmail API. Now just click on it, And click ‘Enable’.

Now to get the details, Go to ‘Credentials’ Then click ‘Create Credentials’ And then click on ‘OAuth client ID‘

Now click ‘Configure Consent Screen’ on the next page that loads up, And you will get a page as shown in the image below, where you’re to enable ‘External’ and then hit ‘Create‘

It will take you to a new page where we need to enter the app information.

In the ‘App Name’ field, enter the project name which you have given earlier. Enter your Google account email in the ‘User Support Email’ field, And then go down to the ‘Developer contact information’ area and enter your email address in the ‘Email address’ field. This is the email address Google will use to contact you. Click ‘Save and continue’ After that.
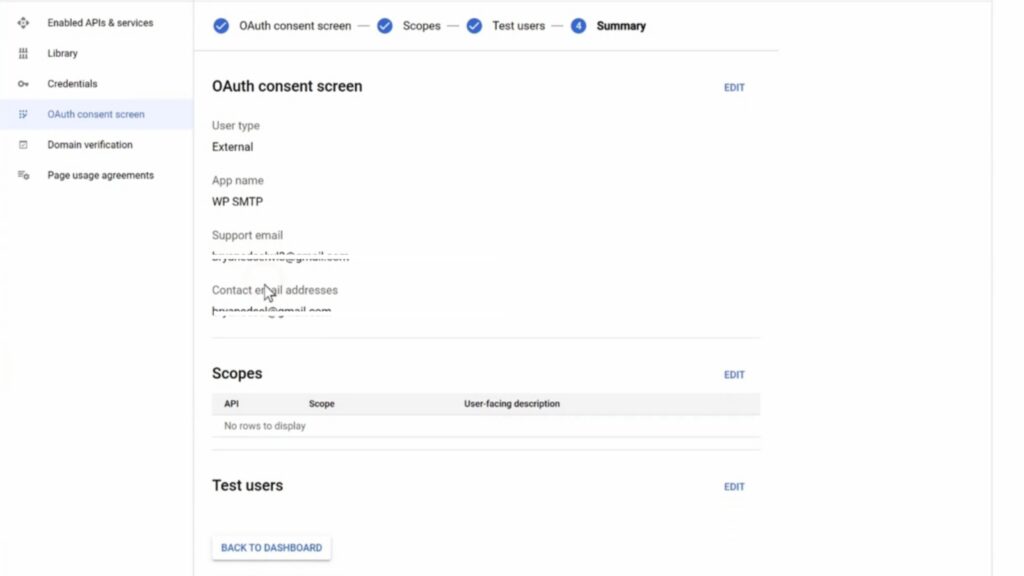
Just keep clicking ‘Save and continue’ on the following pages until you reach the page as shown in the image below, and then click ‘Back to Dashboard’
Now on the next page that loads up as shown below, find and click on ‘publish app’ after which It will ask us to submit our app for verification. So just click ‘confirm’.

Now to get the details, click ‘Credentials’ From the menu on the left side of the screen, then click ‘Create Credentials’ and then ‘OAuth Client ID’

And it will take you to a new page as shown in the image below. Click on ‘Application Type’ and select ‘Web Application’ from the drop-down. Now go down to ‘Authorized redirect URL’ and enter the URL from the plugin in Step 1, and then click ‘Create’ and both keys will be generated.

Now all we have to do is to copy both keys and place them in their respective fields inside the SMTP Plugin and then Click ‘save settings’

Now to complete connecting the website with the Google Cloud Platform, click the button ‘Allow plugin to send email using your Google account‘ button that appears, Now select your google account, click ‘advanced’ then click the ‘go to wpmailsmpt.com‘ link as shown in the image below and that’s it. You’ll get a success message inside the plugin.

Conclusion
After successfully completing the instructions in this guide, all the email delivery issues will be solved and email coming to and fro your Gmail through your WordPress website will start appearing in the ‘Inbox‘ instead of the ‘Spam Folder‘.